My shopping cart
Your cart is currently empty.
Continue Shopping
A single improper door installation mistake can cost you more than the door itself. What starts as a weekend DIY project or a seemingly straightforward contractor job can quickly spiral into thousands of dollars in unexpected expenses. Whether you’re installing doors yourself or overseeing a professional installation, understanding these costly pitfalls can save you significant money and frustration, and following the manufacturer's instructions is essential for proper installation, warranty, and quality.
Door installation mistakes, including improper sealing, don’t just affect your door’s functionality—they create a domino effect of expensive problems that compound over time. Studies show that door and window leaks account for up to 30% of heating and cooling energy loss in residential homes, directly impacting your energy bills month after month.
The sobering reality is that approximately 30% of door installations require costly adjustments within the first year due to improper alignment and installation. These corrections often cost 2-3 times more than doing the job correctly from the start because they involve undoing completed work, purchasing additional materials, and paying for extra labor.
Prevention consistently costs significantly less than correction when it comes to door installation. A proper installation using quality materials might add $200-500 to your upfront costs, but avoiding these 10 common mistakes can save you thousands in repairs, energy waste, and prolong the door’s longevity over the door’s lifespan. Always follow the manufacturer’s instructions for handling, preparation, and installation to ensure a proper fit and to maintain your warranty coverage. Following the manufacturer's instructions also ensures the door's longevity and optimal performance, helping to prevent issues caused by improper weatherproofing or hinge installation.
Here are the 10 most expensive mistakes homeowners make during door installation, along with their real-world cost impacts and prevention strategies.
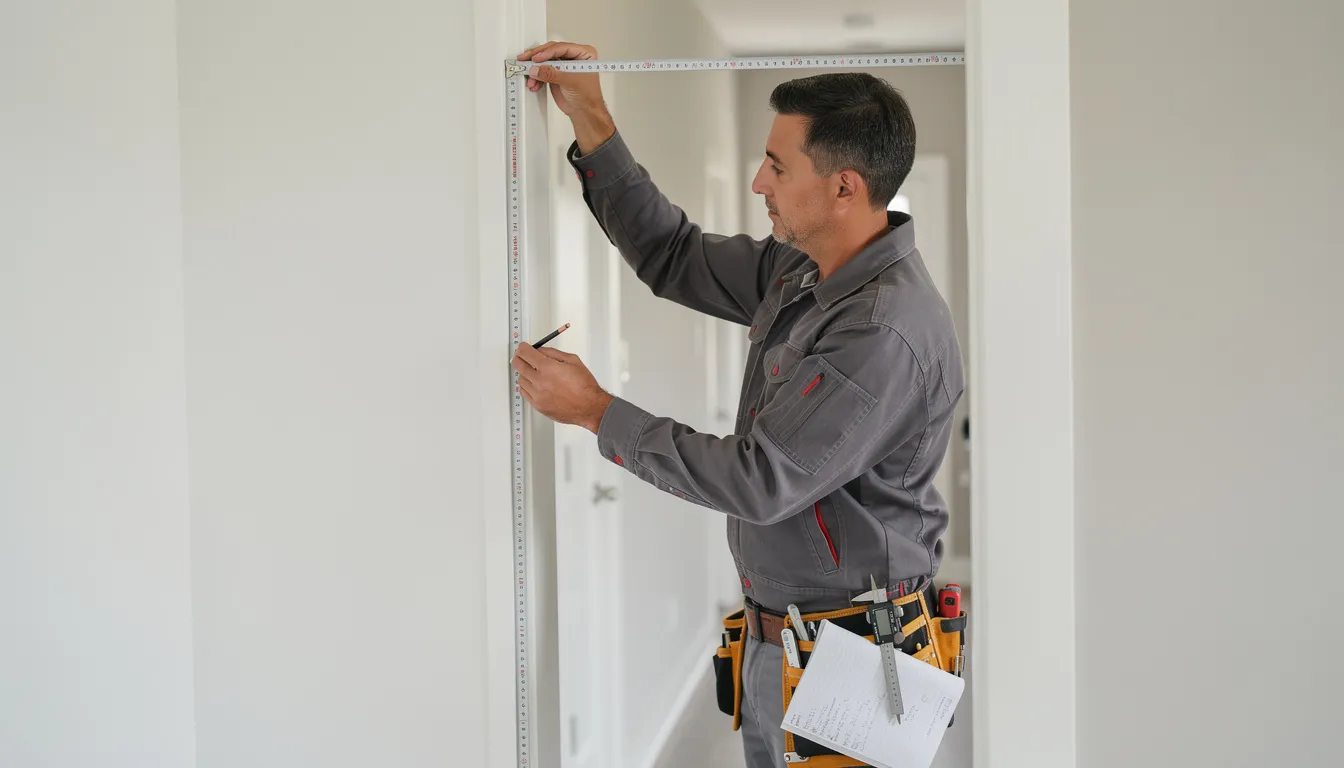
Before you even begin the door installation process, taking the right preparatory steps can make all the difference between a flawless fit and a costly redo. Start by measuring the rough opening with precision—this ensures your door frame will fit perfectly and prevents the cascade of issues that stem from improper door installation. Double check your measurements at multiple points and account for any irregularities in the wall or floor.
Next, consider the door’s functionality and determine the correct swing direction. A door that opens the wrong way can block walkways or interfere with furniture placement, leading to frustration and unnecessary expenses. Think about how the door will be used and how it fits into the flow of your space.
Choosing the right door material is also crucial at this stage. Solid core doors offer superior durability and sound insulation, while wooden doors provide classic appeal. Each material has its own installation requirements, so factor this into your planning.
Don’t overlook local building codes—these regulations exist to ensure safety, accessibility, and energy efficiency. Failing to comply can result in fines or forced corrections. If you’re unsure about any aspect of the installation process, consulting a professional door installer can help you avoid common door installation mistakes and ensure your project starts off on the right foot.
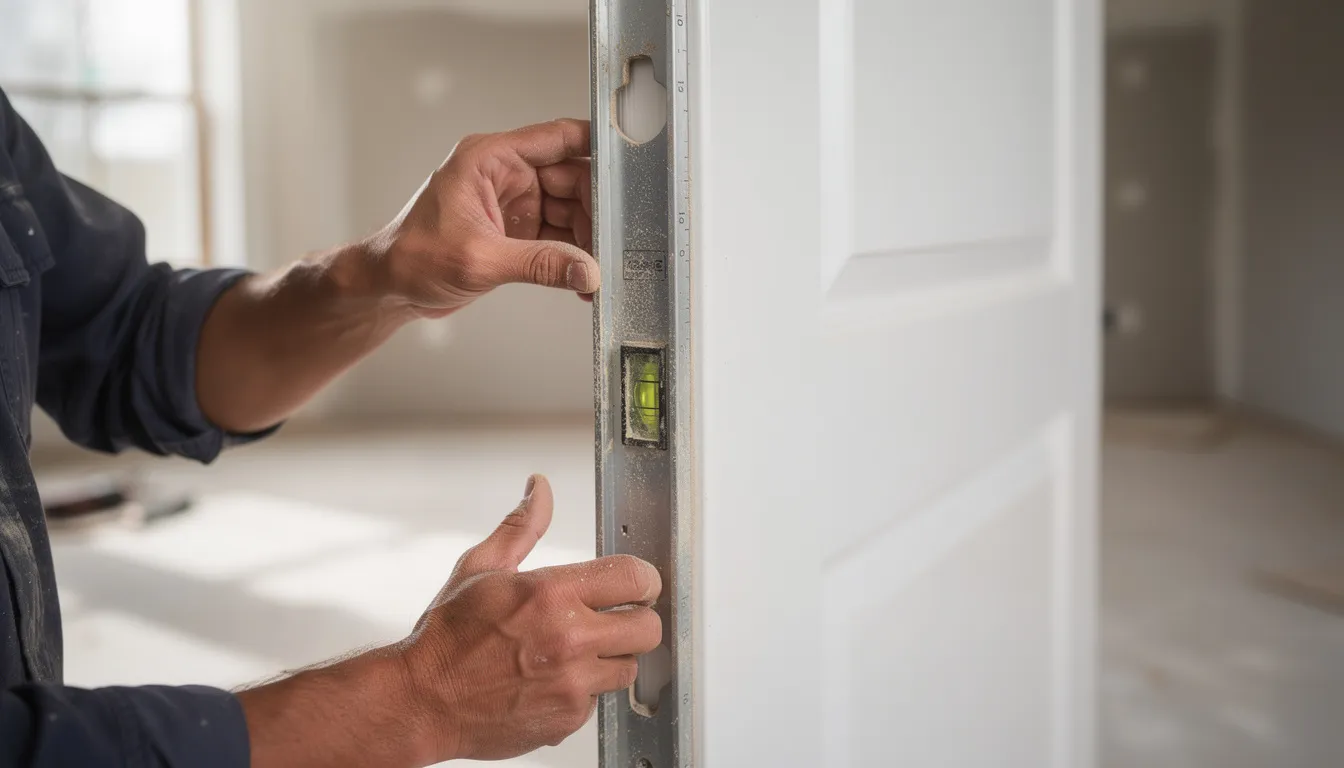
Proper door frame preparation is the backbone of a successful door installation. Before you even think about hanging a new door, it’s essential to ensure the door frame is level, plumb, and securely attached to the surrounding wall. Start by using a reliable leveling tool to check that the frame is vertically straight and perfectly aligned. Any deviation at this stage can lead to a misaligned or uneven door, which not only affects the door’s functionality but can also result in costly future issues.
Once alignment is confirmed, use quality materials—such as heavy-duty screws or nails—to securely attach the frame to the wall. This step is crucial for creating a solid foundation that will support the door’s weight and daily use. A correctly installed door frame helps prevent common door installation mistakes, such as doors that stick, don’t latch properly, or develop gaps over time.
Taking the time to prepare the door frame properly ensures a secure fit for your new door and sets the stage for a smooth installation process. By focusing on this foundational step, you can avoid many of the common door installation problems that lead to expensive repairs down the line.
Selecting the right door material is about more than just looks—it’s a decision that impacts both aesthetics and the door’s long-term performance. Consider your home’s style and the specific needs of the space. For example, a wooden door can add warmth and character to an entryway, while a solid core door is ideal for rooms where sound insulation and energy efficiency are priorities.
Using the wrong door material is a common door installation mistake that can lead to uneven door frames, improper sealing, and even premature wear. For exterior doors, energy efficiency is especially important; a poorly insulated door can drive up your energy bills and reduce comfort. Interior doors, on the other hand, should be chosen for both aesthetics and function, ensuring they fit the space and operate smoothly.
Don’t forget about door hardware. The right hinges, strike plate, and other components are essential for proper door operation. Skimping on quality or mismatching hardware to your door material can result in doors that don’t latch properly or develop issues like squeaky hinges and improper sealing.
By carefully considering both the door material and hardware, you can avoid common door installation mistakes and ensure your new door enhances your home’s appearance and functionality.
A successful door installation starts with having the right tools and equipment on hand. Essential tools include a leveling tool to ensure your door is properly aligned, a tape measure for accurate sizing, and screwdrivers for securing hardware. Using quality materials and the proper tools helps prevent common door installation mistakes such as misaligned or uneven doors, which can lead to future issues and costly repairs.
A professional door installer will arrive with all the necessary equipment, from specialized drills to shims and fasteners designed for your specific door type. This expertise ensures your door is correctly installed and operates smoothly from day one.
If you’re tackling the installation yourself, invest in quality materials and double check that you have all the tools required for the job. Taking shortcuts with tools or materials often leads to installation mistakes that can compromise the door’s performance and longevity.
Installing exterior doors comes with its own set of challenges and considerations that go beyond those of interior door installation. The choice of door material is especially important—solid core doors and high-quality wooden doors not only boost your home’s aesthetic appeal but also play a key role in improving energy efficiency and security.
Begin the installation process by preparing the rough opening, making sure it matches the size and shape required for your chosen door. Next, install the door frame, taking extra care to level and plumb it so the door will operate smoothly and sit flush against the weather stripping. Properly aligning hinge locations at this stage is critical to avoid common door installation mistakes like sagging or misaligned doors.
When hanging the door, follow the manufacturer’s instructions closely to ensure all components are securely attached and the door is correctly installed. Pay special attention to sealing around the frame to prevent air and water leaks, which can undermine energy efficiency and lead to future damage. Always check that your installation meets local building codes, as these regulations are designed to ensure both safety and performance.
Given the complexity and importance of exterior doors, seeking professional help from a qualified door installer is often the best way to guarantee a secure fit and long-lasting results. A professional can help you avoid costly installation mistakes and ensure your new door enhances both the look and efficiency of your home.
Cost impact: $200-800 for frame modifications, new door, or professional correction
Measuring errors represent the most fundamental and expensive mistake in door installation. When you fail to measure accurately, you create a cascade of problems that affect every subsequent step of the installation process. The rough opening must accommodate not just the door frame itself, but also the thickness of drywall, flooring changes, and proper insulation space.
Common measurement mistakes include forgetting to account for drywall thickness (typically 1/2 to 5/8 inch on each side), overlooking planned flooring height changes, and failing to check if walls are plumb and level before measuring. A door that’s even 1/4 inch too wide for the opening requires expensive structural modifications, while an opening that’s too large compromises the door’s structural integrity and energy efficiency.
The “measure twice, cut once” principle becomes crucial here because lumber, drywall repair, and professional correction services can quickly add up. When measurements are wrong, you might need to:
To double check measurements, always measure the rough opening at three points: top, middle, and bottom for width, and left, center, and right for height. Use a quality leveling tool to ensure accuracy, and remember that the goal is to fit perfectly within your existing space while maintaining proper clearances.
Cost impact: $150-500 for door sagging repairs and hardware replacement
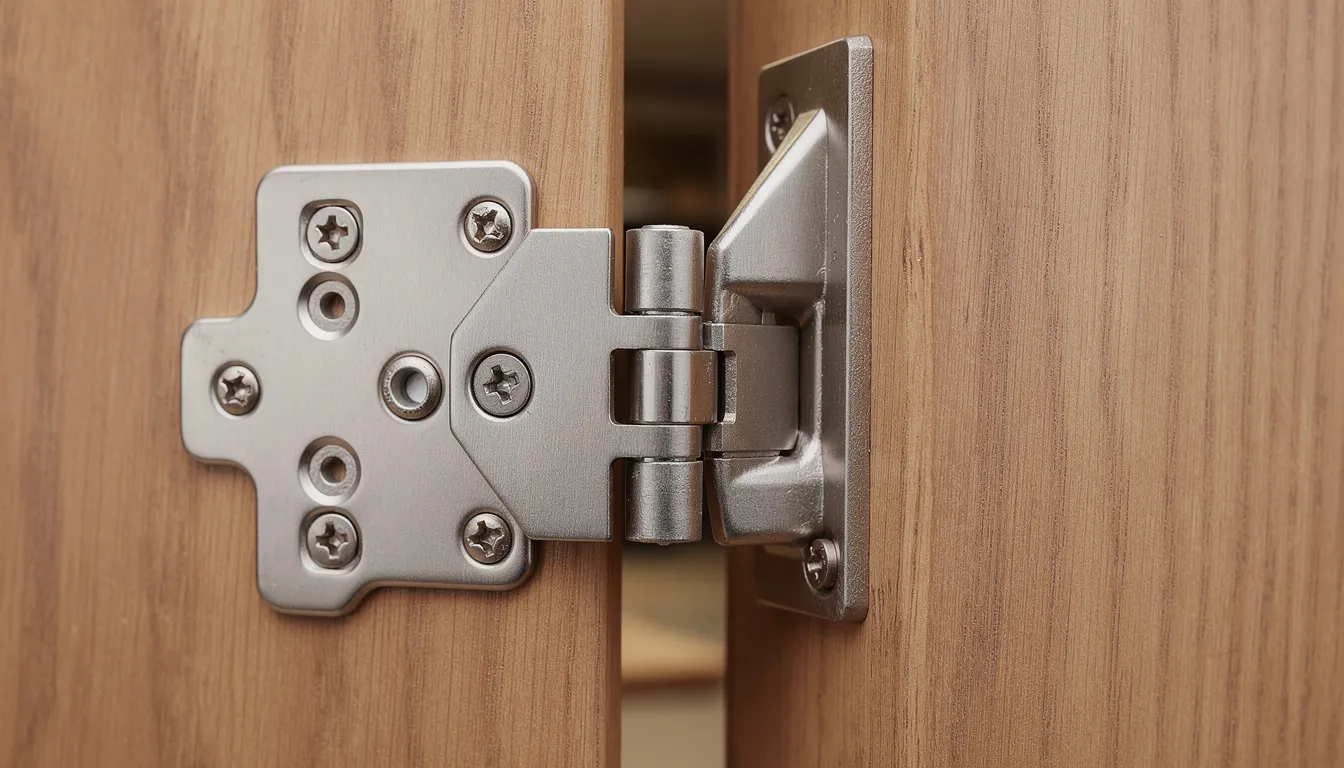
The choice between quality fasteners and cheap alternatives might seem trivial, but it creates one of the most persistent and expensive problems in door installation. Improper fasteners and hinge pins cause door hinges to gradually pull away from the frame, leading to a misaligned or uneven door that doesn’t close properly or latch properly.
Hollow core doors require different fastener specifications than solid core doors due to weight differences. A standard interior door weighs 25-35 pounds, while solid wood or steel exterior doors can weigh 80-120 pounds. Using standard 1-inch screws for heavy doors instead of proper 3-inch screws allows the weight to gradually work the fasteners loose. Using screws that are too short or weak can lead to the door sagging, pulling away from the jamb, or even detaching over time.
The long-term costs of inadequate fasteners include:
Using the wrong door hardware can also impact the door's performance.
Quality fasteners designed for your specific door material and weight ensure the door remains securely attached and properly aligned. Choosing the right hinges is crucial for the door's functionality, and heavier doors require stronger, larger, and more durable hinges. When fasteners are loose screws become a recurring problem, investing in proper hardware from the start prevents the frustration and expense of repeatedly fixing the same issue.
Professional door installers recommend using galvanized or stainless steel screws that are rated for your door’s weight according to the manufacturer’s instructions. Properly securing the hinges is essential to prevent sagging over time, misplaced hinges can cause binding and uneven door swing, and using the wrong screws can exacerbate hinge problems. Always follow the manufacturer's instructions for fastener and hinge selection to ensure long-term performance. The slight additional cost of quality fasteners pays for itself by eliminating future repair needs and ensuring your door operates smoothly for years.
Cost impact: $300-1,200 annually in increased energy bills
Poor weatherstripping can also create a structural weakness, representing one of the most expensive long-term mistakes because it continuously drains your budget through increased energy bills. Skipping weatherproofing can result in drafts, water damage, and significant energy loss, increasing utility bills. Inadequate sealing allows conditioned air to escape and outdoor air to enter, forcing your heating and cooling systems to work overtime to maintain comfortable temperatures.
The financial impact compounds monthly, with poor door sealing costing homeowners $25-100 per month in additional heating and cooling expenses. Over a year, this seemingly small oversight can increase your energy bills by hundreds of dollars. In regions with extreme temperatures, the costs climb even higher.
Beyond energy waste, inadequate weatherstripping allows moisture infiltration that can lead to frame rot, requiring expensive door frame replacement. Water damage around door frames often goes unnoticed until it requires major structural repairs that can cost thousands of dollars.
Quality weatherstripping options include:
Professional-grade weather stripping typically costs $30-80 more than basic options but pays for itself within 6-12 months through energy savings. The investment in proper sealing protects both your budget and your home’s structural integrity while improving energy efficiency significantly. Proper weatherstripping also extends the door's longevity by protecting it from external elements.
Cost impact: $400-1,000 for frame adjustment or complete reinstallation
Door frame alignment issues create some of the most frustrating and expensive problems in door installation. When the door frame isn’t perfectly plumb (vertically straight) and level (horizontally aligned), it causes the misaligned door to bind, stick, or fail to close properly. These problems worsen over time as the misaligned or uneven door puts stress on hinges and hardware.
Foundation settling compounds alignment problems, making minor issues major structural concerns that require professional intervention. A door that initially works despite slight misalignment will gradually develop worse binding as the house settles and the frame shifts further out of alignment.
Early signs of alignment problems include:
The escalating costs of ignoring alignment include replacing door hardware that fails prematurely, adjusting or replacing doors that bind severely, and potentially rebuilding portions of the frame structure. Professional door installers use precision leveling tools and shims to ensure perfect alignment during installation. Ensuring the door and strike plate sit flush within the frame is crucial for smooth operation and security.
Proper shimming during installation prevents future settling problems and ensures a secure fit so the door operates smoothly throughout its lifespan. When the frame is correctly aligned from the start, minor house settling won’t affect door operation, avoiding expensive corrections later.
Cost impact: $250-600 for new door plus installation labor costs
Choosing the wrong door material or size for your specific opening creates immediate problems and long-term expenses. Standard door sizes exist for a reason, but custom situations require careful planning to avoid costly mistakes. When a door doesn’t fit properly, you face the choice between expensive modifications or complete replacement.
Security vulnerabilities emerge when gaps around an improperly sized door create weak points that compromise your home’s protection. These gaps require expensive remediation using additional hardware, modified frames, or security upgrades that add significantly to the project cost.
The “point of no return” occurs when attempting to trim doors incorrectly, potentially damaging the door’s structural integrity or aesthetic appeal. Interior doors have specific clearance requirements, while exterior doors must meet both security and weather sealing standards.
Planning considerations include:
Opting for a pre hung door can simplify installation, especially for beginners, because it comes with a built-in frame that helps ensure proper alignment and fit. This reduces the risk of misalignment or sizing issues that often lead to extra costs.
Custom doors cost significantly more than standard sizes, often adding $200-400 to the project cost. However, this investment prevents the much higher costs of security upgrades, weather sealing problems, and repeated adjustments that result from forcing the wrong size door into an opening.
Cost impact: $200-450 for hinge replacement and door realignment
Door hinges represent the mechanical heart of your door’s operation, and mistakes in selection or placement create ongoing problems that escalate in cost over time. Weight capacity mismatches cause hinge failure within 1-2 years, particularly when lightweight hinges are used with heavy doors like solid wood exterior doors.
Incorrect hinge count for door weight leads to sagging and binding problems. Standard interior doors typically require two hinges, but heavy exterior doors or doors over 80 inches tall need three hinges to distribute weight properly. Using insufficient hinges causes premature wear and door operation problems.
The cost comparison between quality hinges and budget options shows dramatic differences over a 5-year lifespan:
|
Hinge Type |
Initial Cost |
Failure Rate |
Replacement Cost |
5-Year Total |
|---|---|---|---|---|
|
Budget hinges |
$25 |
60% |
$180 |
$205 |
|
Quality hinges |
$60 |
5% |
$20 |
$80 |
Quality hinges that support your door’s weight properly prevent the frustration of doors that don’t close properly, develop squeaky hinges, or require frequent adjustments. Professional installation ensures hinge locations are precisely measured and installed to support smooth door operation.
When door hinges fail, the repair process often requires removing the door, drilling new holes, and potentially repairing damaged frame areas. This work requires skill and specialized tools, often necessitating professional help even for homeowners comfortable with basic installations.
Cost impact: $250-800 annually in energy waste plus potential water damage
Thermal bridging through uninsulated gaps around a wooden door frames creates continuous energy loss that impacts your bills year-round. Proper insulation prevents heat transfer and air movement that forces heating and cooling systems to work harder to maintain comfortable temperatures.
The choice between spray foam and fiberglass insulation affects both initial costs and long-term performance:
Spray foam advantages:
Fiberglass considerations:
Professional-grade insulation installation typically costs $50-120 more than basic approaches but pays for itself within 8-15 months through energy savings. The investment in proper insulation also prevents moisture problems that can lead to frame rot and expensive structural repairs.
Poor insulation allows temperature differences that create condensation problems, potentially leading to mold growth and structural damage around the door frame. These issues often require expensive remediation and frame replacement that far exceeds the cost of proper initial insulation.
Cost impact: $150-400 for door trimming, rehang, or replacement
Timing mistakes in the installation process create expensive rework when doors are installed before flooring projects are completed. Carpet, hardwood, or tile installation significantly affects door clearances, often requiring doors to be trimmed, removed, or even replaced to accommodate new flooring heights.
The costs of removing and reinstalling doors after flooring changes include labor for door removal, storage during flooring installation, trimming or modification work, and reinstallation. Professional installers often charge nearly as much for reinstallation as original installation due to the additional complexity.

Proper installation sequence prevents double labor costs:
When flooring installation occurs after door installation, common problems include doors that block walkways, don’t swing open properly, or require expensive modifications to fit properly with new floor heights. Planning the installation sequence carefully prevents these costly delays and modifications.
Different flooring types create different clearance requirements, with thick materials like tile and hardwood potentially adding 1/2 to 3/4 inch to floor height. Anticipating these changes during door installation prevents expensive corrections later.
Cost impact: $500-2,500 in fines, reinspection fees, and correction work
Local building codes establish safety and performance standards that affect door installation in ways many homeowners don’t anticipate. Common code violations include incorrect fire door specifications, inadequate egress requirements, and failure to meet accessibility standards for the right door that can result in expensive corrections and legal penalties.
Code compliance protects both your safety and your financial investment. Insurance coverage can be compromised when installations don’t meet local codes, potentially leaving you liable for damage costs that insurance would otherwise cover. Property values also suffer when installations fail inspection requirements.
Building permit costs range from $50-200 in most areas, while violation penalties and forced corrections often cost 5-10 times more. The permit process ensures your installation meets safety standards and provides documentation for future property sales.
Common code considerations include:
Professional door installer services include code compliance verification as part of their standard service, helping ensure your installation meets all requirements without costly surprises during inspection.
Cost impact: $100-350 for adjustments after walls are finished
Skipping operational testing before completing surrounding work creates expensive correction scenarios when door sticking, binding, or hardware problems are discovered after drywall and trim installation. Making adjustments after finishing work requires damaging completed surfaces and redoing finish work.
Drywall and trim damage costs from fixing installation problems post-completion often exceed the original installation cost. Professional painters, drywall contractors, and trim carpenters must be called back to repair damage from accessing door adjustment points, which can also disrupt furniture placement .
Simple testing steps that prevent expensive corrections include:
Hardware functionality issues discovered late in the process require accessing connection points that may be hidden behind finished surfaces. Testing reveals problems when corrections are simple and inexpensive, rather than when they require damaging completed work.
Temperature and humidity changes affect door operation, so testing should occur under various conditions when possible. A door that operates smoothly during dry conditions might bind when humidity causes wood expansion, requiring adjustments that are much easier to make before finishing work is complete.
Thorough testing and adjustment before final installation help ensure the door's longevity by preventing issues that could cause premature wear or damage.
Safety should always be a top priority during the door installation process. Start by wearing protective gear such as gloves and safety glasses to shield yourself from sharp edges and flying debris. Keep your work area clean and free of obstacles to prevent trips and falls, especially when handling heavy doors or using power tools.
Always follow the manufacturer’s instructions for both the door and any tools you’re using. Following the manufacturer's instructions ensures proper installation, safety, and maintains warranty coverage. Take regular breaks to avoid fatigue, which can lead to mistakes or accidents. If you’re unsure about any step, don’t hesitate to seek help from a professional door installer, who will have the experience and knowledge to ensure a secure fit and a safe installation.
By prioritizing safety, you not only protect yourself but also help guarantee that your door installation is completed without incident, resulting in a door that’s both functional and securely attached.
Once your door installation is complete, a thorough final check is essential to catch any lingering issues before they become future problems. Start by confirming the door’s swing direction and making sure it opens and closes smoothly without sticking or scraping. Test the latch to ensure it engages properly and that the door is securely attached to the frame.
Inspect the alignment of the door and hinge locations—everything should be properly aligned, with no gaps or unevenness around the frame. Check for any signs of improper sealing, which can impact energy efficiency and lead to drafts or moisture problems.
Address any squeaky hinges with a quick application of silicone spray, and verify that all hardware is tight and functioning as intended. This final inspection helps you spot and correct common door installation mistakes, ensuring your door will perform reliably and efficiently for years to come.
Regular maintenance, such as lubricating hinges and checking for wear, will further improve energy efficiency and extend your door’s longevity. These steps are essential for maximizing the door's longevity, helping to prevent damage from external elements and maintaining structural integrity over time. By following these expert tips, you can enjoy a flawless finish and avoid the headaches of future installation mistakes.
Creating a realistic budget with 15-20% contingency for unexpected issues protects against cost overruns when door installation problems arise. This buffer covers minor corrections and material upgrades that often become necessary during installation.
Quality material investments that save money long-term include:
Understanding when to splurge versus when to save helps optimize your budget allocation. Splurge on structural elements like hinges, fasteners, and weatherstripping that affect long-term performance. Save on cosmetic elements that can be upgraded later without affecting functionality.
ROI timelines for proper door installation versus cheap shortcuts consistently favor quality approaches:
Cost comparison between DIY mistakes and professional door installer fees shows that professional installation often costs less when you factor in error correction, material waste, and time investment. Professional installers complete installations efficiently with proper tools and experience that prevent common mistakes.
Warranty protection and liability coverage with licensed installers provide financial protection against installation defects and damage claims that homeowners bear when doing their own work. Professional warranties typically cover both materials and labor for 1-3 years.
Time value analysis reveals that professional efficiency versus the DIY learning curve can make professional installation more cost-effective. Professionals complete complex installations in 2-4 hours while homeowners often spend full weekends on projects that still require corrections.
Red flags indicating when professional help prevents costly disasters include:
In these situations, it is highly recommended to seek professional assistance to ensure proper installation and avoid costly mistakes.
Professional door installers bring specialized equipment, industry knowledge, and insurance protection that eliminates many risks associated with door installation mistakes. Their expertise in local building codes, proper installation techniques, and quality materials helps ensure your door installation protects your budget rather than draining it.
The investment in professional installation typically pays for itself through avoided mistakes, warranty protection, and the peace of mind that comes from knowing your door was installed correctly the first time. When you consider the cumulative costs of the 10 door installation mistakes that drain your budget, professional installation often represents the most cost-effective approach to ensuring your door functions properly for years to come.
If you’re planning to install a new door, taking advantage of additional resources can make all the difference in avoiding common door installation mistakes. There are countless online tutorials and step-by-step videos that walk you through everything from how to measure accurately to installing door hinges and ensuring proper insulation. Manufacturer’s instructions and door installation guides offer expert advice on selecting the right door material, fitting door hardware, and preventing air leaks for improved energy efficiency.
For more personalized guidance, consider consulting a professional door installer. These experts can answer your questions, recommend the right tools and materials, and help you make informed decisions tailored to your specific project. Home improvement websites, door installation blogs, and even local hardware stores are also valuable sources of information and support.
No matter which resources you use, always double check measurements, use proper tools, and follow safety guidelines throughout the installation process. By staying informed and prepared, you’ll be able to prevent common door installation mistakes, ensure a secure fit, and enjoy a correctly installed door that enhances your home’s comfort, style, and energy efficiency.


Trade Program
Are You a Trade Professional?
Architects, designers, and contractors receive exclusive pricing and dedicated project support.
Learn About Trade Pricing →Get Started
Our team can help with product selection, sizing, and specification — at no charge.


