My shopping cart
Your cart is currently empty.
Continue Shopping
Hanging a door in an existing frame can be simple if you know the steps. Assuming the existing frame is in good condition and the new door matches the required dimensions, the process is straightforward. We’ll guide you on how to hang a door in an existing frame, from gathering tools to final adjustments. With this step by step guide, your new door will fit perfectly and work smoothly.
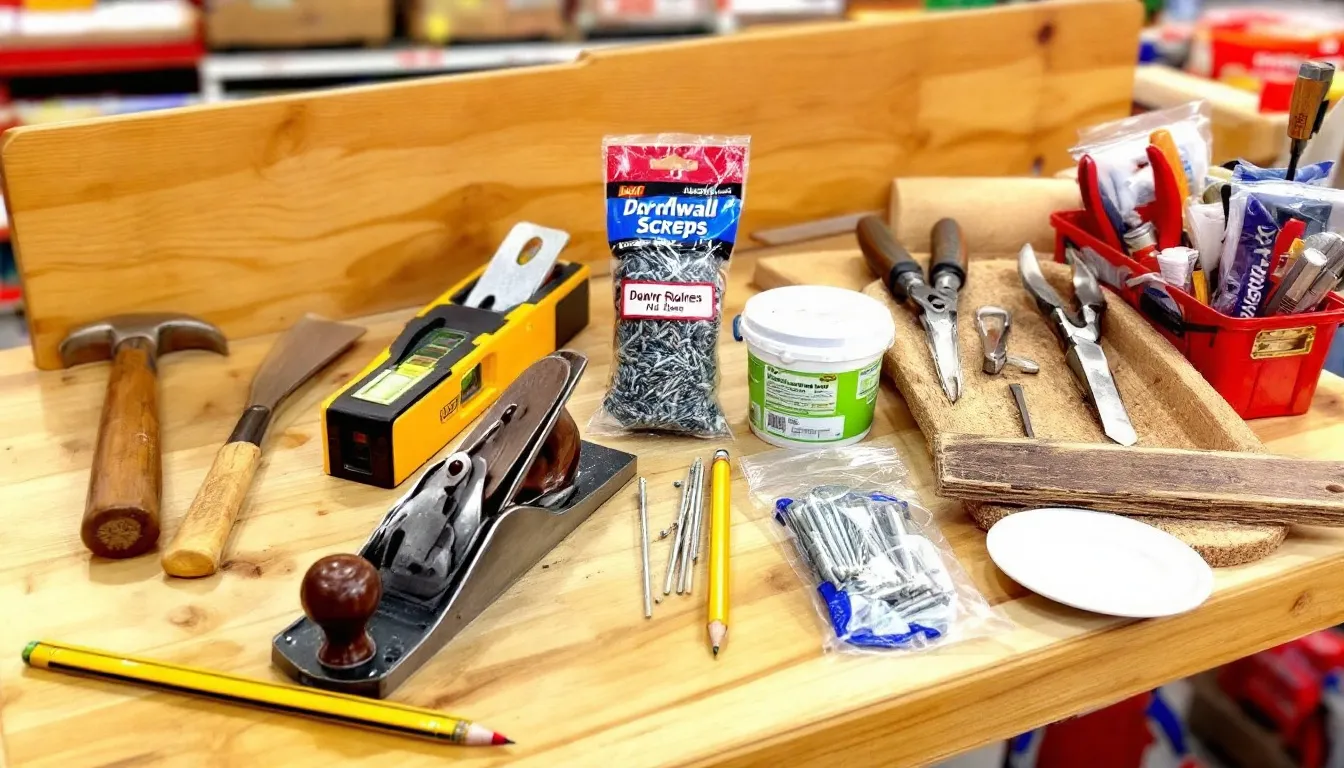
As you embark on the task of installing a new door, it’s paramount to assemble all essential tools ahead of time for an efficient and trouble-free execution. Proper tools not only make the process easier, but also contribute to a secure and accurate job completion. It is crucial when handling such tasks with determination, making sure your hard work pays off and that meticulous attention is paid throughout each step, especially if you value precision and a successful outcome as seen in instructional videos.
When affixing hinges or locksets, having a drill along with various-sized drill bits at hand will facilitate the creation of pilot holes for secure screw installation. For mortising hinges or hardware with greater precision, a router can also be used to achieve a clean and accurate fit. To guarantee that your door hangs correctly and that its frame remains aligned, using a level can be invaluable.
For precise scoring or trimming along the door’s edge, employ a utility knife. Do not forget about securing screws as well as hinges themselves. These components are vital in fastening your new portal firmly within its jamb.
Equipped with these instruments at your disposal means you’re ready to commence operation: start by taking down the old door from its place, and you may need to run the hinge pins out of the hinges during removal.

Commence the task, you must first extract the existing door. The old door and its hinges need to be removed as part of the process. It might seem simple, but it’s vital to perform this with care to prevent any harm to the delicate inner door frame or jamb during this step. This is essential for ensuring that doors are detached appropriately.
Initiate by detaching the hinges. If feasible, enlist assistance in holding up the door. Doing so will help avert potential damage or injury if it were to topple over. For those hinges equipped with pins that can be taken out, employ a slender screwdriver or a pair of pliers for pin removal and then hoist away from its setting within the frame.
In situations where hinges are permanently attached and do not have removable pins, proceed by unscrewing them directly off of their anchor points on the frame while making certain there’s support for your door at all times thus averting any accidental incidents. With completion of extraction comes time for readying your new entryway component into place.
Once the old door has been taken out, place the new door into its frame and carefully mark where it lines up for a precise fit. For a truly fitted result, use a scribe to accurately mark the door, ensuring it matches the frame perfectly. This is essential to guarantee that once in place, the door will function smoothly without any issues.
Take into consideration floor coverings by increasing the bottom measurement of your new door slightly. This adjustment is particularly important if there are thick carpets or rugs within your home. Whether the new door will fit without major adjustments depends on the condition and dimensions of the existing frame.
Then proceed to measure and cut with precision so that the new door snugly fits into its designated frame without any discrepancies. Failing to do so can lead to an issue with the door’s operation.
Before starting, it’s important to follow the proper course of measuring and cutting the new door to fit the existing frame, ensuring the frame is in good condition and the new door matches the required size and specifications.
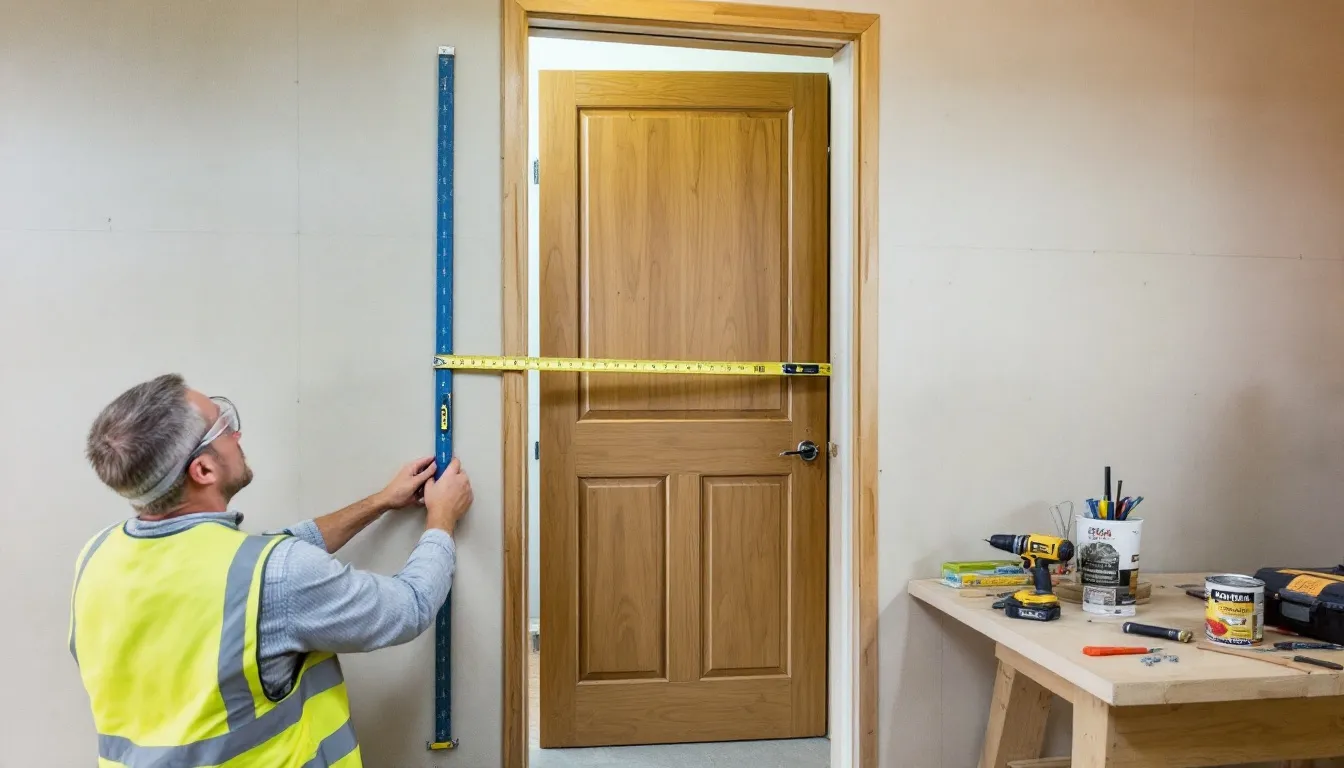
Accurate measurement is key to a perfect fit. Use a tape measure to take multiple measurements of the door frame’s width and height, making sure to measure both sides of the frame to ensure accuracy. Since variations are common, use the largest dimensions for a proper fit that fits.
Consider clearance at the bottom for flooring, especially if you have thick carpets or rugs. The new door should be about 1/8 inch smaller than the frame’s width, allowing for an even gap of around 0.125 inches around its edges.
Before cutting, check the existing frame for irregularities that might affect the fitting. Trim the new door to the correct size with a circular saw, adjusting as needed to align with any uneven surfaces.
To achieve a close and secure fit, meticulous planing and precise scribing are critical steps. Gently pare away at the margins of your new door using a hand plane, taking care to progress incrementally while regularly measuring to prevent excessive material removal, which can ensure the door fits tightly.
Employing a scribing instrument is advisable for outlining the exact outline of the frame onto your new door’s edge. Angling the edges of the door slightly inwards—known as beveling—may facilitate its unobstructed movement through the doorway when it opens and closes. For optimal fitting, beveling should be done on the inside edge of the door.
Ensure that the hinges are affixed properly to facilitate correct hanging and seamless function of the new door. Always start with the hinge side of the door frame to ensure correct alignment before proceeding. When installing a new door, it is crucial to align it precisely with the existing door jamb to ensure proper fit and operation. Factor in the thickness of the hinge and use shims as needed to achieve a fit that is flush and even.
The proper placement of hinges is key. Position them with precision, setting the top hinge roughly 5 inches from the door’s upper edge and situating the bottom hinge about 10 inches up from its lower end. It is essential for smooth operation that these hinges be both level across their horizontal axis and plumb along their vertical line.
Ensure that the hinge positions are marked correctly by employing a square, which guarantees that the markings will be perfectly perpendicular for accurate alignment.
For an exact fit, carefully carve out the mortises for the hinges so they match the size and depth of your hinge leaves. The mortise edges need to be neat and precise since this is essential for installing hinges correctly and ensuring smooth door operation. You can use tape on your chisel as a guide to achieve the proper depth in relation to the thickness of your hinges.
Employ a wood chisel to accurately carve out mortises for the hinges on the door, ensuring precision in this task. It is crucial that these recesses are cleanly executed and sized correctly so that the hinges fit perfectly flush against both the door and its frame.
Once the hinges are in place, gently raise and position the door within its designated frame, using your hands to carefully guide the door into place. Use either wooden or rubber wedges to hold it at the correct height while you outline where the hinges will go.
Before fixing the hinge screws, drill preliminary pilot holes to prevent any wood fractures. Start by securing each hinge with a single screw, then test how well the door moves before fully attaching it with all remaining screws.
Post-installation of the door, inspect how well it fits into its frame and proceed with any required modifications. Employ a block plane for shaving down surplus wood in order to refine its fit. Make the rest of the necessary adjustments, such as trimming or patching, to ensure the door fits perfectly and is securely installed. Running through these steps methodically will help ensure a successful installation.
Some adjustments might be needed to ensure a perfect fit. However, certain adjustments can be difficult without the proper tools or experience. Use wood shims to adjust the door’s fit during hanging. Check for gaps around the door and frame to ensure proper sealing and insulation, as eliminating gaps can prevent drafts and improve energy efficiency. If the hinge isn’t flush, deepen the mortise to prevent issues with closing.
Place cardboard behind sunken hinges to alleviate binding. Properly countersinking screws and using longer screws in hinges can improve fit and prevent binding. Correct hinge alignment is essential to prevent the door from binding against the frame.
Next, install the lockset on the lock side. The standard hole size should be 2 1/8 inches in diameter. Drill a bore hole into the door’s edge to accommodate the latch mechanism.
After drilling, tap the latch into the prepared mortise. Beveling the latch side of the new door ensures good clearance for closing.
Completing the lockset installation is the final step before testing the door to ensure proper function.

The objective of the final touches is to ensure a refined and professional appearance. Achieving a seamless finish on stained wood trim requires dulling its gloss, which can be done either by sanding or applying a liquid de-glosser. Take care during this process to avoid creating a mess, as improper technique or lack of preparation can lead to unwanted drips, splatters, or uneven surfaces. To keep any wood stains from seeping into later layers of paint, it’s crucial to apply a top-notch primer.
For trim paint of superior quality, consider using water-based alkyds that replicate the effect of oil paints without leaving brush marks behind. However, be aware that some finishing options may be limited depending on the type of trim or paint used, which can affect your choice of products and techniques. When working with expansive flat areas such as door panels or trims, employing rollers not only expedites the process but also helps in attaining an even coat.
Maintain your tools in prime condition for enduring use in upcoming repair and restoration projects by cleaning them immediately after painting activities are complete.
To summarize, installing a new door within an existing frame entails a sequence of meticulous procedures. These include accumulating the necessary tools, taking out the old door, readying the new one for installation, affixing hinges to it, placing it on its frame, making precise adjustments so that it fits properly and lastly fitting in the lockset. Each stage is essential to guarantee a perfect job. It's also worth considering whether replacing the door while keeping the old frame is practical, as the condition of the old frame can affect the overall result and long-term value of your effort.
Adhering to this comprehensive guide allows you to elevate an average doorway into something remarkable by improving both its utility and visual appeal. With careful focus and patience throughout each step of the process comes the reward of accomplishing a well-executed task.
To hang a new door in an existing frame, you will need a drill, level, utility knife, hinges, screws, and a hand plane.
These essential tools will ensure a proper installation.
To remove the old door without damaging the frame, support it while unscrewing the hinges or removing the hinge pins, and carefully lift the door away from the frame.
This method minimizes the risk of damage.
To ensure the new door fits properly in the existing frame, measure the frame accurately and consider any floor coverings.
Trim the door to achieve a gap of approximately 0.125 inches around its edges for a proper fit.
The best way to install hinges on a new door is to mark the hinge positions accurately, chisel the mortises to the correct size and depth, and ensure that the hinges are level and plumb for proper functionality.
This approach will ensure a professional and reliable installation.
To resolve door binding against the frame, consider using wood shims, deepening hinge mortises, and ensuring screws are properly countersunk.
These adjustments will help align the door correctly and eliminate binding issues.


Get Started
Our team can help with product selection, sizing, and specification — at no charge.


